Telegram Public Profile Photo
Telegram Public Profile Photos: A Complete Guide to Privacy & Visibility
Telegram offers users complete control over their profile photos, allowing them to decide who can see their pictures. With customizable privacy settings, users can manage visibility for specific contacts, groups, or the general public. This feature enhances privacy while maintaining flexibility for those who want to personalize their Telegram experience. In this guide, we’ll explain how Telegram’s Public Profile Photos work, why they’re useful, and how to set them up.
What Are Telegram’s Public Profile Photos?
Telegram’s privacy settings allow users to set different profile photos for different audiences. You can choose to show a particular image to the public while keeping a different one visible only to selected contacts or groups. This way, you maintain a professional or anonymous presence for unknown users while displaying a more personal image for friends and family.
Why Are Public Profile Photos Useful?
1. Enhanced Privacy Control
Not everyone wants their profile picture visible to strangers. With Telegram’s settings, you can:
- Hide your profile photo from unknown users.
- Allow only select contacts or groups to view your real picture.
- Set a separate public photo that maintains your anonymity.
2. Professional and Personal Separation
For professionals using Telegram for work, having different profile pictures ensures you maintain a formal image for business contacts while keeping a casual one for friends.
3. Protection from Unwanted Attention
By restricting access to your real profile photo, you reduce the chances of unwanted attention, catfishing, or identity misuse.
How to Set Up Telegram’s Public Profile Photos
Step 1: Open Telegram Settings
- Open the Telegram app on your mobile device or desktop.
- Tap on the three-line menu in the top-left corner (Android) or go to Settings (iPhone).
- Select Privacy & Security.
Set Up Telegram’s Public Profile
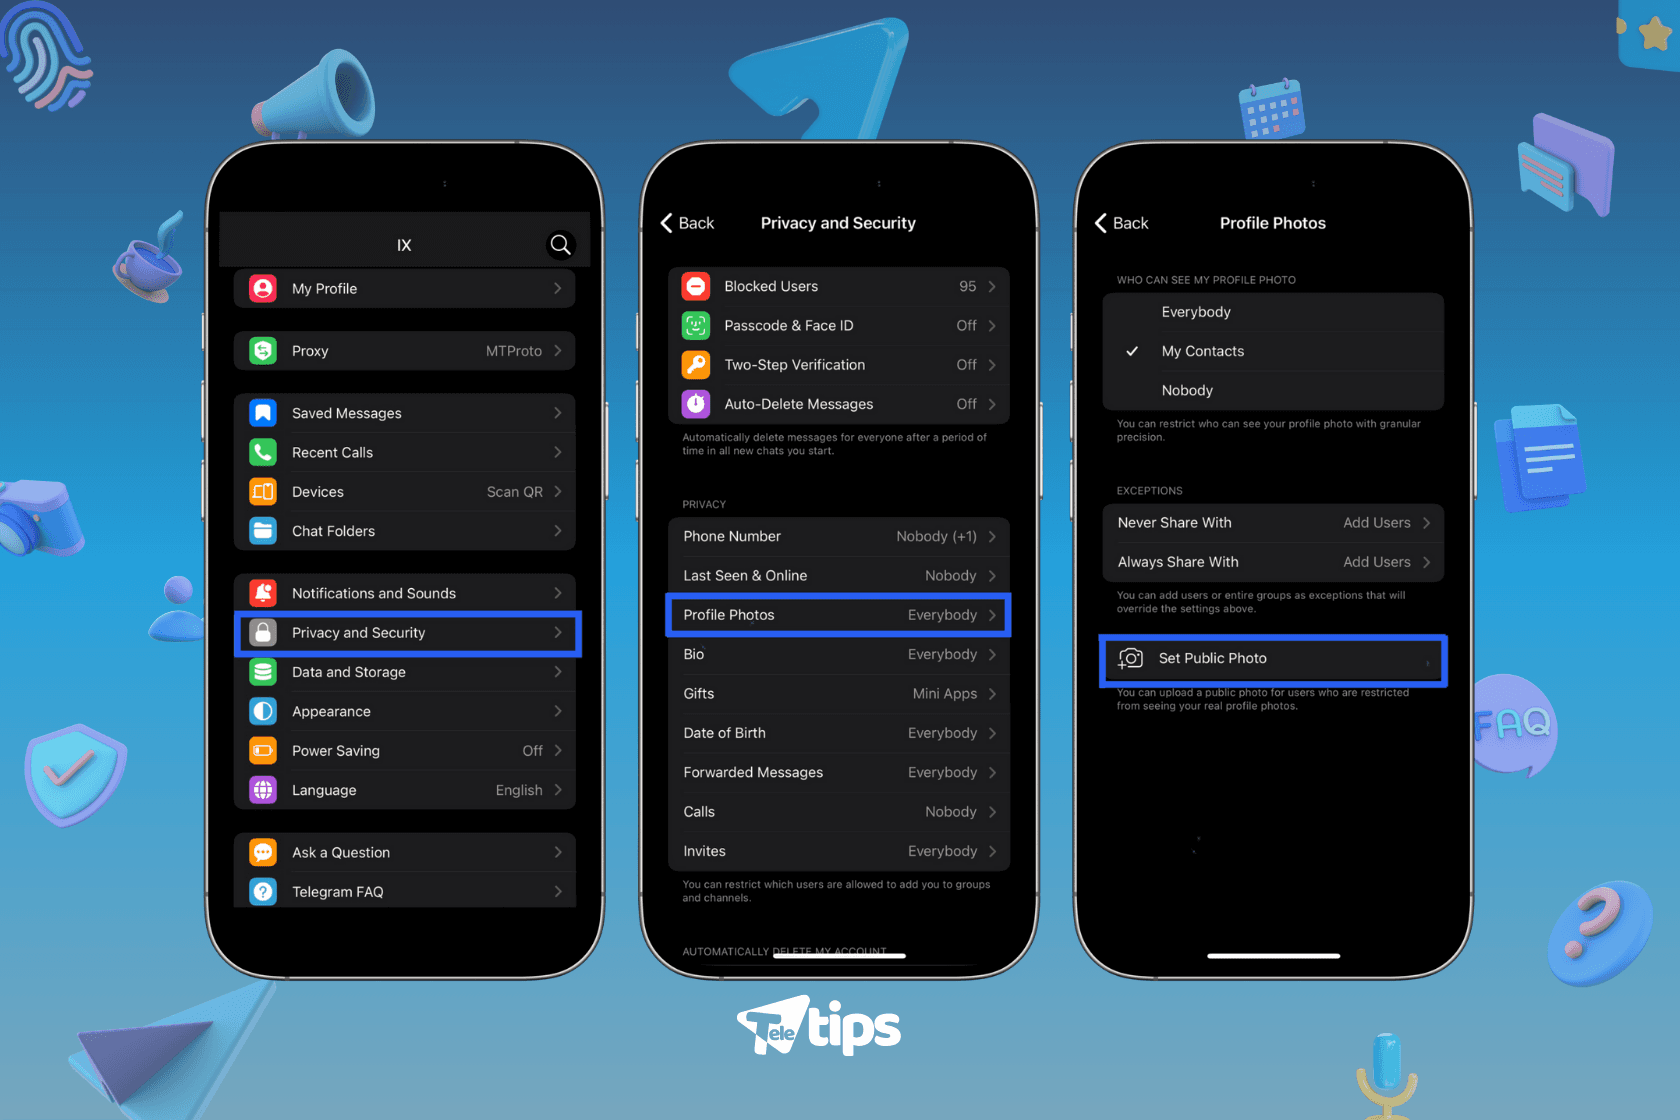
Step 2: Adjust Profile Photo Privacy
- Under Privacy & Security, tap on Profile Photo & Video.
- Choose My Contacts to restrict access or Nobody if you want full privacy.
- Tap on Add Exceptions if you want to allow or block specific people.
Step 3: Set a Public Profile Photo
- Go back to your profile.
- Tap on your profile picture.
- Select Set Public Photo.
- Choose a picture that will be visible to users who can’t see your main profile photo.
- Save changes.
Now, only the people you allow will see your main profile picture, while others will see your chosen public photo.
Tips for Using Public Profile Photos Effectively
- Use a Professional Image if you’re using Telegram for business.
- Keep It Anonymous by choosing a logo, avatar, or artistic picture instead of a personal photo.
- Regularly Update Your Settings to ensure they align with your privacy preferences.
- Test Visibility using a second account or asking a friend to check what they can see.
Conclusion
Telegram’s Public Profile Photo feature is a powerful tool for managing privacy and visibility on the platform. Whether you want to keep your identity secure, separate work from personal life, or maintain a professional appearance, these settings offer full control over who sees your profile picture. Take a few minutes to customize your settings and enjoy a safer, more personalized Telegram experience.
Recommended Posts

How to Send Direct Messages to Telegram Channels
How to send direct messages to Telegram channels, chat privately with owners or admins, and enable direct messaging for your own channel. Includes step-by-step tutorial and tips.

How to Use Telegram Topic Tabs to Organize and Navigate Group Chats Easily
Learn how Telegram Topic Tabs help you organize large group chats into clear, clickable sections. Discover their benefits, layouts, and step-by-step setup tutorial for better chat navigation.

How to Send Photos in Higher Quality on Telegram
Learn how to send photos in HD on Telegram with 4× more pixels, plus how to send them as files at original resolution. Step-by-step tutorial included.
